
If you’re trying to raise your bag’s selling price without a major redesign, quality bag hardware is one of the fastest upgrades you can make. Customers may not know plating chemistry or alloy grades, but they instantly feel whether a zipper glides,and whether a strap hook feels solid or flimsy. Hardware is a high-contact component—so it strongly shapes perceived value and pricing power.
This article targets a common buyer pain point: how hardware contributes to premium pricing. You’ll learn why hardware creates “luxury” perception, what quality really means, and how to test hardware so your products look expensive—and stay that way.
Table of Contents
- Why Hardware Signals Luxury
- What “Quality Hardware” Actually Means
- 7 Fast Tests to Judge Hardware Quality (No Lab Needed)
- Lab & Standard Tests Buyers Should Request
- Common Failures & How to Prevent Them
- References
[Image suggestion: Infographic showing how touch/weight/sound/durability/finish consistency drive perceived value and pricing power.]
Why Hardware Signals Luxury
1) Hardware is a sensory shortcut
In shopping behavior, people use quick cues to judge quality—especially touch, weight, and sound. A heavier clasp, smooth slider movement, and clean “snap” can make a bag feel premium even before long-term durability is proven. Research reviews on touch cues show that tactile properties influence consumer perception and product evaluation because touch strongly affects emotion-laden judgments.
2) Hardware is where “cheap” shows first
A bag can have good pattern work and stitching, but one low-quality part can ruin the entire feel. The most common “cheap signals” are:
- Zippers that catch or feel gritty
- Clasps that squeak, wobble, or misalign
- Uneven plating color or visible casting marks
- Sharp edges on D-rings and buckles
- Rattling hooks and unstable strap attachments
3) Hardware supports your brand story
Luxury is confidence. When closures operate smoothly and finishes stay clean over time, the product “keeps its promise.” For B2B buyers, hardware quality translates into fewer after-sales complaints, better reviews, lower returns, and a clearer reason to charge more.
What “Quality Hardware” Actually Means
Quality isn’t just “gold vs silver.” Strong hardware typically combines four measurable dimensions:
- Material integrity: base metal, wall thickness, and structural design.
- Surface finish: consistent plating/coating, smooth texture, minimal pitting, anti-tarnish protection.
- Precision & feel: tight tolerance, minimal play, quiet operation, smooth movement.
- Durability: resistance to sweat, humidity, rain, rubbing, and impact.
[Image suggestion: Simple cross-section diagram showing thin-wall vs thick-wall hardware structure to explain durability differences.]
Note: zinc alloy is widely used in fashion hardware and can still be high quality when engineered and plated correctly. Most problems come from porous castings, weak mechanical design, or plating systems that are too thin or poorly adhered.
7 Fast Tests to Judge Hardware Quality (No Lab Needed)
Use these checks on samples before approving production. They’re quick, practical, and good at catching red flags early.
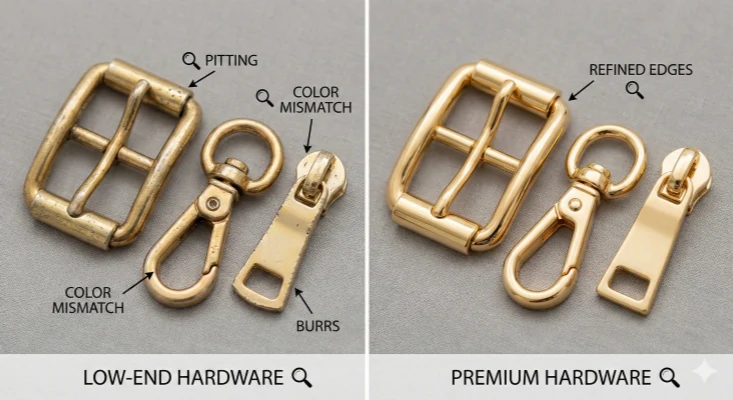
1) Visual finish inspection (10 seconds)
- Color uniformity across multiple pieces
- Edges: rounded and refined vs sharp and rough
- Surface: no pinholes, bubbles, cloudy patches, or wave marks
- Branding details: crisp logo and clean engraving
2) Fingernail scratch + coin rub (30 seconds)
Scratch a hidden area lightly with a fingernail, then rub a corner (high-contact zone) with a coin/key for 20–30 seconds.
- Pass look: minimal marks, no sudden color shift
- Fail look: fast wear-through, streaks, or base metal showing
[Image suggestion: Step-by-step photos of the coin-rub test (before/during/after) with macro close-ups of wear.]
3) Wobble & rattle test (rings, hooks, locks)
Hold the bag by strap attachment points and gently shake. Premium feel usually has controlled movement—not loose rattling. Excessive wobble often indicates weak tolerances or thin walls.
4) Magnet check (material clue)
A small magnet helps detect unexpected material content. It doesn’t prove quality, but it catches mismatches between what was promised and what’s delivered.
5) Zipper glide test (the one-hand rule)
Try opening/closing with one hand on a flat surface. Then repeat while the bag is lightly flexed or filled. Good zippers glide with steady resistance; poor ones snag at curves, jam under load, or feel gritty.
[Image suggestion: GIF/video thumbnail showing one-hand zipper glide test, plus a “loaded bag” glide comparison.]
6) Sweat simulation wipe (quick reality test)
Wipe hardware with a slightly damp cloth and a tiny amount of salt, leave for 1–2 hours, then wipe clean. Immediate discoloration is a warning sign of weak protection.
7) Light impact check (sample-level)
From table height, let a hardware-heavy area gently drop onto a wooden surface. You’re checking whether the finish chips easily or the mechanism jams afterward.
[Image suggestion: A printable checklist image summarizing the 7 fast tests for buyers to save and share.]
Lab & Standard Tests Buyers Should Request
If you’re building a premium line (or selling to demanding markets), add at least one standardized test to your QA plan. Test reports also help justify price upgrades with evidence.
1) Salt spray corrosion testing (plating durability)
Salt spray testing is widely used to assess corrosion resistance and detect coating discontinuities like pores and defects. ISO 9227 specifies procedures for neutral and acidified salt spray methods and positions them as useful for quality control; it also notes they are not a perfect predictor of long-term real-world performance. ASTM B117 is a common practice for operating salt spray apparatus under controlled conditions.
What to specify: test method (ISO 9227 NSS/AASS/CASS), target hours, and pass/fail criteria (corrosion, pitting, blistering, discoloration).
[Image suggestion: Photo/diagram of a salt spray chamber setup and sample outcomes (white rust/red rust/pitting) to explain corrosion testing.]
2) Coating thickness measurement (XRF)
Batch consistency is a major pain point. ISO 3497 describes X-ray spectrometric methods used to measure metallic coating thickness. Thickness control helps prevent the “first sample looks great, later batches wear off faster” problem.
[Image suggestion: Photo of XRF thickness measurement and a simple graphic showing thin vs adequate coating thickness wear behavior.]
3) Coating adhesion screening (cross-cut)
ISO 2409 specifies a cross-cut method to assess coating resistance to separation from a substrate. It’s a practical screen for whether a coating is likely to peel at edges or under stress.
4) Zipper strength testing (when zippers are a key selling point)
ASTM D2061 covers strength test methods for zippers and zipper parts. If you claim “premium zippers,” strength testing supports procurement consistency and reduces returns.
[Image suggestion: Photo of zipper strength test equipment and a diagram showing where load is applied (slider/pull/stop areas).]
Spec Sheet Template (Copy/Paste)
Use this structure in your RFQ so “better hardware” becomes measurable:
- Hardware list: zipper, slider/puller, clasp/lock, buckles, D-rings, hooks, logo plate, rivets, bag feet.
- Base material: brass / zinc alloy / stainless steel (and any nickel-free requirements).
- Finish system: plating/coating type, topcoat requirements, anti-tarnish requirement.
- Color control: golden sample, color tolerance, batch approval process.
- Durability target: salt spray method + hours + evaluation criteria.
- Functional tests: zipper strength, closure cycle test, pull strength for strap hardware.
- Inspection & reporting: AQL level, incoming QC checklist, third-party lab reports for key SKUs.
[Image suggestion: Screenshot-style table graphic of the hardware spec sheet template to improve shareability.]
Common Failures & How to Prevent Them
Failure 1: “The gold turned black”
- Likely causes: weak anti-tarnish protection, thin/uneven plating, sweat/humidity exposure.
- Prevention: set corrosion test thresholds, control thickness (XRF), specify topcoat for high-contact parts.
Failure 2: “Clasp feels loose after 2 weeks”
- Likely causes: weak spring force, poor tolerances, soft metal deformation, poor mechanism design.
- Prevention: define closure cycle testing and tighten tolerance/material requirements.
Failure 3: “Zipper is stuck / teeth split”
- Likely causes: poor chain/slider match, sewing alignment stress, low strength performance.
- Prevention: test under real load and use standardized methods for acceptance criteria.
[Image suggestion: Macro case-study images of common failures (tarnish, peeling, chipped coating, zipper snag, deformed hook) with short labels.]
Pricing Playbook: Turn Hardware into Premium Margin
To make hardware upgrades translate into higher price (not just higher cost), use this playbook:
- Upgrade premium touchpoints: prioritize zipper, clasp, and strap hook—the parts people touch most.
- Make the upgrade visible: close-up photos of finish consistency; short video of zipper glide/closure “click.”
- Back it with specs: cite corrosion testing programs (ISO 9227), thickness checks (ISO 3497), and zipper tests (ASTM D2061).
- Sell reliability: position better hardware as fewer returns, fewer complaints, and better reviews.
[Image suggestion: “Value ladder” chart showing small cost increase vs large perceived value and pricing uplift.]
Suggested internal links for your blog:
References
- ISO 9227 (salt spray corrosion tests): https://www.iso.org/standard/81744.html
- ASTM B117 (salt spray apparatus practice): https://store.astm.org/b0117-19.html
- ISO 3497 (XRF coating thickness): https://www.iso.org/standard/20319.html
- ISO 2409 (cross-cut test): https://www.iso.org/standard/76041.html
- ASTM D2061 (zipper strength tests): https://store.astm.org/d2061-07r21.html
- Hand-feel touch cues review (open access): https://pmc.ncbi.nlm.nih.gov/articles/PMC6678767/