Estimated Reading Time: 6 minutes
Table of Contents
- Quick Tools You Need (No Lab Equipment)
- Step 1: Compare to the Approved Sample
- Step 2: Materials Check (Touch, Smell, Surface)
- Step 3: Stitching & Seams (Strength Without Overthinking)
- Step 4: Hardware Check (Zippers, Buckles, Hooks)
- Step 5: Lining & Interior (Hidden Problems)
- Step 6: Shape, Structure & Measurements
- Step 7: Real-Life Function Tests
- Step 8: Packaging & Labeling
- Red Flags That Should Stop Shipment
- One-Page Checklist Summary
Quick Tools You Need (No Lab Equipment)
- A tape measure or ruler
- A clean white cloth (for wipe tests)
- Your phone flashlight
- A pen + paper (or notes app) to record defects by carton
- Optional: a small luggage scale (for weight consistency)
[Image suggestion: A simple flat-lay photo showing ruler, white cloth, flashlight, and a sample bag.]
Step 1: Compare to the Approved Sample
Before checking details, do a “big picture” comparison with your approved sample (or your confirmed photos/spec sheet). Many disputes come from expectations not matching the delivered product.
- Color: Compare under the same lighting. If possible, check under daylight near a window.
- Logo position: Is it centered and straight? Is the size correct?
- Overall feel: Does the bag feel noticeably thinner, lighter, or “cheaper” than the sample?
If the bulk goods do not match the sample in obvious ways, pause and document first. Don’t let the inspection become “normalizing” a big mismatch.
Step 2: Materials Check (Touch, Smell, Surface)
2.1 Touch test
- Surface consistency: Run your hand across panels. You should not feel random bumps, waves, or rough patches unless it’s a planned texture.
- Stiffness: Lightly bend a corner. A bag can be structured, but the surface should not feel brittle or “about to crack.”
2.2 Smell test
Open the bag and smell inside. A mild “new product” smell is normal. A strong chemical odor is a common reason for customer complaints and can be a sign of poor finishing or insufficient airing.
Odor checks are commonly included in professional bag inspections and checklists, because strong smells are a real buyer-facing issue. Source: Tetra Inspection and Testcoo bag inspection checklists. [1] [2]
2.3 Wipe test (color transfer)
Rub a clean white cloth on dark areas (especially black/red) for 10 seconds. If the cloth picks up color, your customers’ clothing can get stained.
2.4 Surface defect scan
Use your phone flashlight at an angle to spot:
- Scratches, glue marks, dents
- Uneven coating or shiny patches
- Printing misalignment (if printed fabric)
Step 3: Stitching & Seams (Strength Without Overthinking)
You don’t need to count every stitch. You just need to spot the defects that cause returns.
3.1 Look for “broken lines”
- Skipped stitches: tiny gaps where the seam looks like it “jumped.”
- Loose threads: a few is okay, but repeated loose ends everywhere means poor finishing.
- Wavy seams: seams that curve when they should be straight can signal uneven tension and weak points.
3.2 Stress point check (handles and strap attachments)
Handles, strap tabs, and hooks are the first parts to fail. Pull firmly (not violently) and watch the seam area. If you see the seam opening or threads stretching, it’s a problem.
Many inspection guides highlight strap/handle strength and seam pulling tests as key functional checks because they directly affect durability. Source: Testcoo bag QC checklist. [2]
Step 4: Hardware Check (Zippers, Buckles, Hooks)
4.1 Zipper test (simple and effective)
- Open/close the zipper 20 times at normal speed.
- Try it when the bag is slightly filled (a phone, wallet, small towel).
- Feel for snagging, scraping, or “stuck points.”
Professional inspections include zipper function tests for exactly this reason: a zipper that jams is one of the fastest ways to trigger a return. Source: Tetra Inspection. [1]
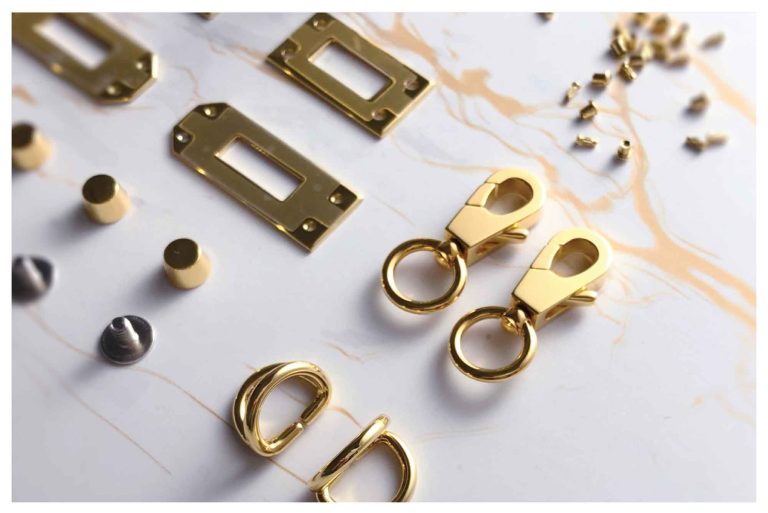
4.2 Metal surface and plating check
- Scratches: especially on logo plates and buckle faces.
- Color match: do all metal parts match (gold with gold, silver with silver)?
- Sharp edges: run a finger along corners—hardware should not cut or feel sharp.
4.3 Buckles, hooks, snaps
- Click test: snaps should close with a clean “click,” not a soft mushy feel.
- Swivel hooks: should rotate smoothly without grinding.
- Adjustment buckles: should hold strap length without slipping.
Step 5: Lining & Interior (Hidden Problems)
Interior problems don’t show in photos, but buyers notice quickly.
- Lining wrinkles: some wrinkles are normal, but extreme bunching means poor fitting.
- Pocket alignment: pockets should be straight and usable (not sewn half shut).
- Inside seams: check for raw edges, loose thread balls, and exposed glue.
[Image suggestion: Photo of inside lining and pocket stitching with a flashlight highlighting details.]
Step 6: Shape, Structure & Measurements
6.1 Symmetry check
Place the bag on a flat table. Look from the front:
- Are left and right sides the same height?
- Is the handle/strap centered?
- Does the base sit flat or wobble?
6.2 Measure the “buyer-critical” dimensions
- Bag length/height/width
- Handle drop (distance from handle top to bag opening)
- Strap length range (min/max if adjustable)
Even small measurement shifts can change how the bag fits on the body (and lead to customer disappointment).
Step 7: Real-Life Function Tests
These are the checks that prevent 80% of “daily use” complaints.
7.1 Load test (simple)
Put some weight inside (for example, a laptop + bottle for a work tote, or a few books). Hold the bag by the handle for 60 seconds. Then carry by the strap for 60 seconds. Watch for:
- Strap attachments stretching
- Handle edges cracking
- Hardware bending
7.2 Drop/impact reality check (careful)
If your bag is meant for daily use, a gentle drop test can reveal weak construction. Some QC checklists include load/drop-style checks as a practical way to catch handle and seam issues early. Source: LeelineBags checklist discussion. [3]
7.3 Strap comfort
Try it on. If the strap edge feels sharp, your customers will feel it too. Comfort issues become negative reviews fast.
Step 8: Packaging & Labeling
- Dust bag / polybag: clean, no strange odor, no dirt marks.
- Stuffing: bag should be filled enough to protect shape.
- Labels: correct brand name, correct color/style, correct barcode if applicable.
- Cartons: not crushed, taped well, correct shipping marks.
Red Flags That Should Stop Shipment
- Strong chemical odor across multiple cartons
- Zippers jam on multiple units during the 20-cycle test
- Strap/handle stitching visibly opening under a basic load hold
- Major color mismatch vs approved sample
- Sharp hardware edges that can cut skin or snag clothing
- High rate of logo misplacement or crooked logos
If you see these issues, document with photos/video and carton numbers, then pause shipment and request a corrective plan.
One-Page Checklist Summary
Use this as your quick inspection script:
- Match bulk goods to your approved sample (color, logo, feel).
- Material check: touch + flashlight scan + smell.
- Wipe test: white cloth for color transfer.
- Stitching: no skipped stitches, no major loose threads, clean stress points.
- Zipper: 20 open/close cycles, filled bag test.
- Hardware: no scratches, no sharp edges, matching color, smooth function.
- Inside: lining fits, pockets usable, no glue mess.
- Shape: symmetry + base sits flat.
- Measurements: size + handle drop + strap range.
- Packaging: shape protection, clean labels, cartons OK.
If you need a supplier that supports clear specs, sampling, and buyer-friendly QC communication, you can explore: http://www.lilalilabags.com/.
References